Pages

Tuesday, December 2, 2014

Month 7

Week 31
Week 32


Week 33
Week 34

Month 7 was an up and down month for us. Lots of mood swings. One second Ollie is happy and laughing and the next he is sobbing. Who knows. He is certainly moving all over the place, and these weekly pictures are getting harder and harder to take. 

But, all in all, he has become the best kid. Our lives are starting to feel like they are finally coming back to normal. Date nights have resumed and we are actually attempting to try new things. 


He loves his swim classes and learned to pull himself up this month. 


Now it is all he wants to do. That and eat!


Such a ham. 


Sunday, November 23, 2014

Weekly Pictures.

I finally got around to updating Oliver's weekly pictures. I am by no means a professional photographer (all of them were taken with my iPhone) but I am happy with how they turned out!


Week 21 is my favorite.

You can see the rest by clicking on the tab above. Or by clicking this link. Enjoy my ever changing child. I can't believe he is 33 weeks already. 

Cheers!

Thursday, November 13, 2014

Olykokes

also knows as Donuts.  MMMM donuts... Nothing gets you through grief like comfort food, and donuts are one of my favorites.


We used Alton Brown's recipe and it turned out ok. Not the best donut I've ever had, but still quite tasty. And let's face it, sprinkles make everything taste better!

Cooking long involved meals always gets my mind off of things, so it seemed like a good time to start up our Good Eats challenge again. We made it half way through the second cook book before I got pregnant and too sick to want to cook so we picked up where we left off. Clearly I need to work on my photography too.

Cheers!


Monday, October 20, 2014

Saying Goodbye

This weekend we lost our beloved dog Norman. The grief in the house is palpable. I know some may be confused as to why we would mourn a pet so much but he was far more than just a pet. He was our little man.


 Norman filled our home with love and laughter and snuggles. Oh so many snuggles. When Daniel and I adopted him from the Seattle Pug Rescue five years ago I couldn't have imagined how much he would become the center of our house. With him gone it feels so empty here.


Everything reminds me of him from the pillows he loved to smash down until they were just right, to the yard we made sure to find just for him when we bought this house.

I was looking forward to Oliver and him growing up together. Being playmates and nap mates and for Oliver to see the joy of caring for someone other than himself just as we did.


I'll end with this PSA before I dissolve even more heavily in to tears. Xylitol, a common sugar substitute in things like sugar free gum and candy is EXTREMELY toxic to pets. Even one stick of gum can cause death if eaten by a dog.  For a pug who loved to eat, the cake I made and unthinkingly left on the table was too much to pass up. So please, if you have dogs, just keep the sugar free cakes and candies out of your house. I wouldn't want anyone else to go through this.


We buried Norman outside Oliver's window so we can say goodnight. Oliver probably won't remember him but we definitely won't forget.

Tuesday, October 7, 2014

Front Yard- Before and After

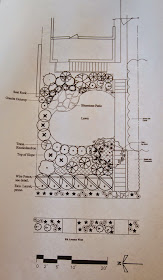
Apparently even professionals can't stick to a deadline. By Friday it was clear they weren't going to finish and after a long day yesterday the yard is 90% complete. The plant order was short so there are a few things still to come, but here is the general picture.

Let's look at the side by side comparison. 

Looking up from the front stairs before:


Now


Looking toward the street


The view from the porch


As you can see it is a million times better. All it needs is a few little tweaks and I can finally call the front yard done! I say it was 100% worth it to pay someone to just get the job done. The whole project was so quick and clean, nothing like it would have been if I did it. Could I have gotten the same results with half the budget? Probably. But it would have taken me months of blood, sweat, and tears. I'll take you around and show you all of the plantings once we are officially done later this week. Maybe I can score some end of the season deals on furniture for out there.

Cheers!


Monday, September 29, 2014

Front Yard Renovation: Day 1

It is amazing what a two man team, working eight hours can do to a space.


This is what our yard looked like this morning:


And this is what it looked like by 4pm:


I can already see the potential.  Be back Saturday with the final reveal!

Cheers!

Saturday, September 27, 2014

Front Yard Plans

So, I've been saying this for two years now but hand to god, we are actually finishing the front yard this year. Know why? We hired someone to do it. All of it. I know, not very DIY of us but sometimes you just have to decide what you are willing to do yourself and what is just not worth your time.

It will be going from this


to this


Work starts Monday and I'm excited to see what paying people to do all the work is like. We seriously thought about doing it ourselves, but just know that with the baby it would take longer than we would like. I've been waiting two long years for this front yard to be done and I'm glad we are finally getting on it.

Be back Tuesday with an update!
Cheers!

Monday, September 22, 2014

Teething 101

Ahh teeth. No fun for the baby, no fun for the parents. Like all baby things, there are a million and one products that claim to fix everything. And, like most parents, we tried them all.


Teethers fall into basically three categories: cooling, chewy, or nubbly. Or some combination of all three.

Here's what we thought: (clockwise from the bottom left)


  • Hand (from the drug store)
    • Pros: cooling and nubbly which Oliver seemed to like
    • Cons: The fingers were too close together to just get one in his mouth

  • Razbaby RaZ-berry Teether
    • Pros: cute and pacifier like. I could clip it to him using the pacifier clip and it didn't fall all over the place.
    • Cons: He kept thinking he was supposed to suck on it and was confused by the texture. He got the hang of it eventually but more as a novelty than a soothing device.
  • Ring Teether (from Whole Foods)
    • Pros: Classic cooling beads. Easy to hold on to.
    • Cons: The beads are huge and don't really "fit" in baby's mouth. 
  • Mam Cooler Teether
    • Pros: Long fingers you could put in the fridge or freezer to cool. Easy to grasp handle
    • Cons: Doesn't stay cold long, but the fingers have texture that is nice
  • Sophie the Giraffe
    • Pros: Cute, natural rubber, easy to chew on
    • Cons: horrible squeaking noise and expensive
  • Silicone Ring (Life Factory from Whole Foods)
    • Pros: Easy to grip, no plastic, four different textures to chew on
    • Cons: not cooling
  • Silicone Chew beads (from Mama and Little)
    • Pros: Baby can wear them, you can wear them. Super easy for little hands to grab and manipulate. 
    • Cons: Once Oliver learned he could pull the clasp apart he is constantly tearing them off his neck
Conclusion? I would find one that cools, and one that is chewy. Oliver loves the chew beads and Life Factory ring as a general fun thing to put in his mouth. When the teeth are really bothering him he prefers the Mam finger teether or the classic ring teether (he sort of sucks on it). 


Though really he loves to chew on everything. 


Cheers!


Wednesday, September 10, 2014

Baby Gates and Baby Steps

Man, blogging is hard. I have to find my camera and then download pictures (and take pictures). Getting back in to the groove is proving more difficult than I though. Add in a 5 month old who has decided he no longer has to sleep through the night (seriously kid!) and you get one tired and distracted momma.

But, we did finish a project!


May I present our new baby gate. 


Isn't it pretty? I knew I saved the door we took down for a reason! I didn't bother to do much to it- just stripped, sanded and stained, letting all of the 112 years of imperfections show. I rather like the result. It is making me want to strip every wood surface in the house. 

In bad blogger form I have no progress pictures or befores but let me tell you, this door was disgusting. Covered in at least 5 layers of paint and stain, including the beautiful hardware. 


We used a new (for us) technique for stripping that is safe and easy (two important factors with a kid in the house). A heat gun! I have another door to strip so I will be sure to include all of the details when we get there, but it is the easiest way to strip paint. Like butter under a hot knife. 

Much better than those metal things and hopefully less likely to cause major accidents. Oliver isn't crawling yet but knowing how long it took to get around to this project I'm glad we are just done.

How did you approach baby-proofing? We are going for the one little step at a time. 

Cheers!


Monday, September 1, 2014

Not So Much of a Honeymoon

Every year, Daniel and I go on a self described "honeymoon" to celebrate our wedding anniversary. We pick a new island in the Caribbean and enjoy a week together. This year, we had a baby, which resulted in a very different kind of vacation.

My parent's graciously offered to come along for the ride so, this past June, the five of us rented a house down in the Florida Keys.


There was some fun, some swimming, and some celebrating; but mostly there was lots of baby.


I'm glad we went but I am already looking forward to next year's honeymoon, just Daniel and me.

Sunday, August 31, 2014

Oliver's Weekly Photos

I loved Young House Love's weekly photo with their first daughter (and now their son) and thought it would be a fun project to do with Oliver. I've been taking a picture each week with Ollie laying on one of the quilts I made before he was born.

Week 1:


Week 21:


How fast they grow... I still need to get them all edited and in the right order but I thought I'd share the project as it is now. If you follow me on Instagram (under englishgrams) I post one every week.

Cheers!
Emily 


Wednesday, August 27, 2014

The Past Seven Months

Ok, so I didn't mean to take quite such a long blogging hiatus but sometimes life happens. Most specifically this happened


Oliver Rex was born at noon on 4/4/14 (an auspicious date) and it's been crazy ever since. A few house things have happened as well as trips and crafts but things that don't involve nursing or changing diapers have dramatically declined. 

Hopefully I won't fall off the bandwagon again but I may be slow. I've missed you blog land!

Cheers!
Emily 

Monday, January 27, 2014

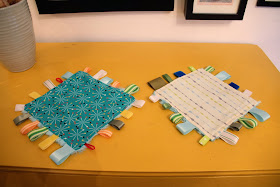
Taggy Blankets- Do I need them? Who knows???

But now I have two.


I whipped these up quick with some leftover ribbon, quilting fabric, and minky.

Even if the baby doesn't enjoy these they are satisfying my nesting urges.

Cheers!

Monday, January 20, 2014

DIY Baby Gym

Obviously I have been having fun making baby things, and this project is no different.


Supplies needed:

  • 1x2x8 foot pine board
  • 3/4 inch dowel (at least 30 inches)
  • Round wood ball (mine are 1 1/4 inches from Joanns)
  • Eye Hooks
  • S-Hooks
  • Chain
I started by cutting my 1x2 down in to 4 equal pieces about 2 feet long. Using my miter saw I cut one end at a 30 degree angle. This provides a stable foot for the gym.


I don't think this is necessary but it looks better in my opinion. 

Next, I marked 1 1/4 inches down from the top of the now 2 foot board and taped two pieces together (just to make sure they are at equal spots on each pair of legs)


Using a 3/4 drill bit I drilled a hole through both boards.


I also drilled a 3/4 inch pocket in my wood balls. 


This was really hard. At first I tried holding with one hand and drilling with the other but all that did was cause bodily harm (so don't do it this way!). After taking a chunk out of my hand I clamped the ball and then drilled. You don't need to drill very deep, this is just to keep the legs from sliding off. 

Thread the dowel through the holes and glue your wooden balls to the ends.


Once everything is dry, measure down an equal distance on each leg (on the inside) and add your eye hooks. 


Attach the chain and S-hook. You don't have to use an s-hook, you could just attach the chain to both sides but the hook makes the whole thing collapse flat. Like so:


There you have it. A simple wooden baby gym: no bells or whistles.


Even better the whole thing cost around $20! I whipped it up over two afternoons (I let the glue dry overnight) and completely by myself. Even 7 months pregnant, it was a pretty easy project.  I hope I was clear enough to help you make your own.  

Cheers!