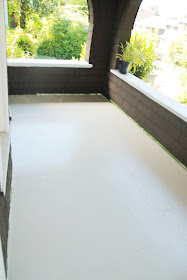
Before
1/4 done (it always gets worse before it gets better right?)
Half way
Complete!
Don't forget the stairs
Before & After
I absolutely LOVE it! Who would have thought even just slapping a bit of paint on the stairs would make them look so much better! You might notice that it is a little different than my original design but when I laid everything out this one looked best.
Now to the nitty gritty. Before I even started painting I read this article from Young House Love about their adventures in stenciling. They make it look so easy but the tips really helped. The biggest thing for me was getting the layout right. My porch isn't perfectly rectangular so I needed to tape everything out before starting. I'm a visual learner so I made copies of the stencil pattern in the exact shape and used those to place them evenly. (I know, a bit wasteful but I needed to see how it would look) This was my first spacing.
I used string to keep the rows straight and centered the designs on the string like so
It really helped me to see the designs as they would be after I painted. I decided it was too cluttered so I re-spaced the papers until I settled on this one (you may noticed I ditched the flowers in the boarder. Again, I didn't want the porch to look too busy)
Then (since I made the fake stencils the same size as the actual stencil) I just taped the edge of one corner as a reference point to remember where I wanted the stencil placed. After that, I picked everything up and was left with my guides. See, the corner of the stencil fits exactly where each tape guide is.
I started with the outline in Benjamin Moore's "wales green". When I finished I immediately pulled up the tape to keep the edges crisp and the started with the far corner stencil (in case I totally screwed up the first one).
I lined my stencil up with my guide and taped the corners. Since John and Sherry at Young House Love made such a big deal about blotting the paint from the brush before beginning I was ready for that problem. What I didn't realize was that doing a two toned stencil was slightly more difficult than one tone. As you can see
it's hard to keep the paint from going over the lines. Luckily I figured out that if you do the dark color first and then clean the over spill with Q-tips it makes it much easier. Off I went alternating the Wales Green from the outside stripe with Bher's "Mojito" (that I had a sample jar of). You may recognize the blue from the guest bed makeover. It's Bher's "Smokey Blue".
Ok, I know, you are supposed to use porch paint not regular paint so that it last longer. But honestly since I wanted to do a three color pattern I didn't want to buy three GALLONS of porch paint just to achieve this look. I like using up the leftovers (and I'm cheap). My plan for making it more durable is to spray each design with a clear coat of protective gloss. At 4.99$ for the clear gloss it made a lot more sense than buying three gallons of porch paint at 26$ a gallon. I just couldn't do it. I'll let you know as soon as I see chipping but as this is supposed to be a short term solution for the front porch until we put hardwood out there I am happy. I can always touch it up.
As a side note I think (since I haven't tried this) I would highly recommend using spray adhesive with the stencil to achieve a crisper edge on the stencil. Since I was stenciling plywood it was so uneven anyway I didn't mind the more "weathered" look but if I was doing this on furniture I would definitely want a cleaner edge. Also, I would use a sponge instead of a stencil brush. I think it would be cleaner.
Now I just have to wait another week to make sure everything is good before moving the furniture on. Just in time for us to go on our vacation! Well, my sister-in-law will enjoy the porch while we are gone (she's watching Norman for us)


Looks great, love the color you chose for your stenciled pattern. I am so jealous that you have a porch :) thanks for sharing at Serenity Now.
ReplyDeleteMary @ Redo 101
Your painted stairs do look really good!
ReplyDelete(Stopping by from Serenity Now)
Thanks for the love! I'm really happy with how it turned out and I love that if I get bored with it I can just repaint!
ReplyDeleteThis is really lovely!
ReplyDeleteI love it! You did a great job. And I really love the design on the stencil. Found you on Serenity Now. I'm your newest follower!
ReplyDeleteOh my word. That is amazing. I wish i had a front porch .... A dream of mine. Love it so much. Your blog is great. I am in love with all your ideas. I found you from another blog i was looking at this morning. Can't wait to see your other ideas to come. I am a follower.
ReplyDelete