I didn't mean to take the summer off, but between visiting family, my 29th birthday and the beautiful Seattle weather not much has been getting done. I have however managed to get a few more projects a little further along. This one is shaping up to be one of my favorites.
Here's the fireplace right after we moved in
and here's how it is looking today
We are still working on matching the trim on the mantel but that should be getting fixed shortly (famous last words right?).
The rug is from Urban Outfitters. I love it.
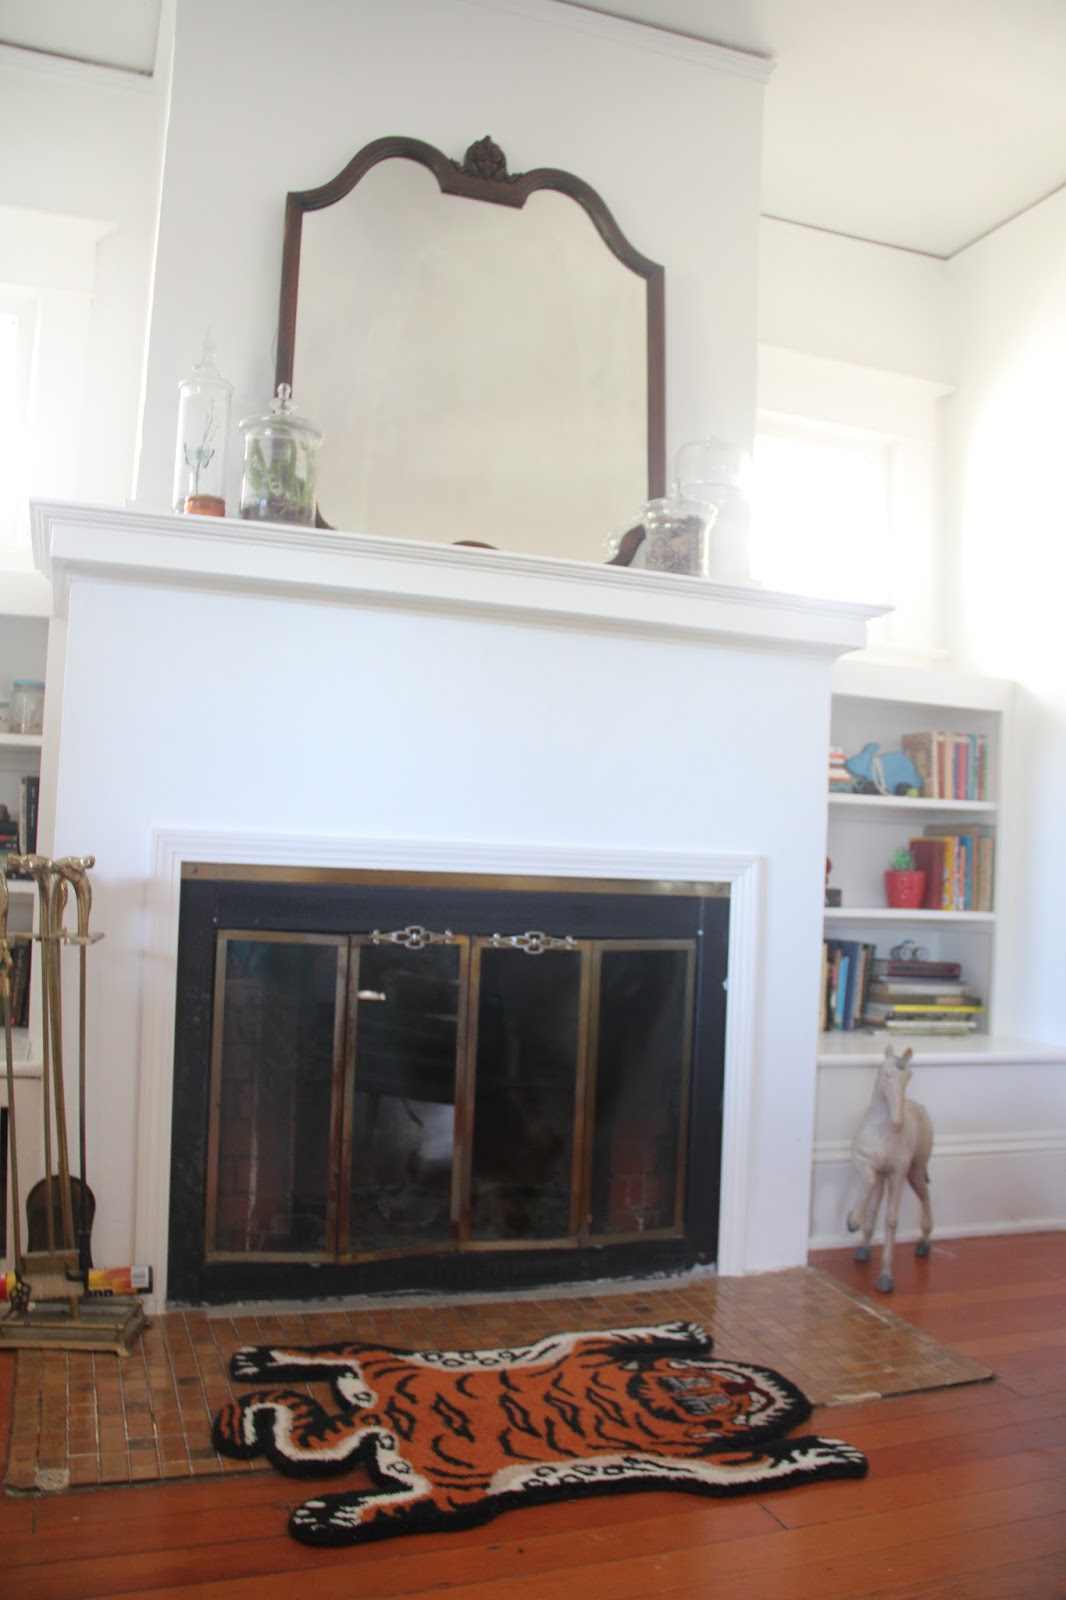
We have plans to add some tile around the fireplace, replace the screen, and replace the hearth so I'm starting to get plans together. I'm thinking something art deco but in neutral colors.
This little sitting area is my favorite place in the house. It is the first thing you see when you enter so I love that it is fun and silly. It sets the tone for the rest of the place.
I'd love to recover the chair and eventually get the poster framed but i'm not in a rush.
So there you have it. A start of something great I'd say.
Cheers!
Tuesday, August 20, 2013
Tuesday, August 6, 2013
DIY Sparkly Shoes: Take 2
Two years ago (almost to the day) I made these sparkly shoes. What I didn't tell you is that they ended up being a complete and utter fail.
After one wear the paint and glitter started peeling off. No good. But my love for sparkly things persists so when this tutorial came around I gave it another go.
I started off with a pair of Tom like shoes from Lands End. I loved the idea of them, but the light color just wasn't practical.
I grabbed some gold fabric paint, gold glitter, and fabric Mod Podge and went at it. In the end I sprinkled even more glitter over the glittery paint just for the fun of it and then sealed it all in with MP. I let the whole thing cure in the sun and gave them a walk about.
Good as gold.
What was different this time? I think the fabric paint adhered to the fabric shoes better than the acrylic to the faux leather. Only time will tell but I've worn them on two long-ish city walks and no peeling or chipping. I'm calling it a success!
Glittered anything lately? Nothing is safe I tell you.
Cheers!
After one wear the paint and glitter started peeling off. No good. But my love for sparkly things persists so when this tutorial came around I gave it another go.
I started off with a pair of Tom like shoes from Lands End. I loved the idea of them, but the light color just wasn't practical.
I grabbed some gold fabric paint, gold glitter, and fabric Mod Podge and went at it. In the end I sprinkled even more glitter over the glittery paint just for the fun of it and then sealed it all in with MP. I let the whole thing cure in the sun and gave them a walk about.
Good as gold.
What was different this time? I think the fabric paint adhered to the fabric shoes better than the acrylic to the faux leather. Only time will tell but I've worn them on two long-ish city walks and no peeling or chipping. I'm calling it a success!
Glittered anything lately? Nothing is safe I tell you.
Cheers!
Thursday, July 25, 2013
Have A Seat
Since we moved the dinning room in to the living room area, the old dinning room has been in flux. I'm still struggling with a few aspects but here is the in-between state.
The chairs are from Fred Meyer a while back and the table is from Cost Plus. The rug is way too small. I bought one from Urban Outfitters but it was too big so I'm back to square one.
The sunshine has been making picture taking difficult but here is the view looking in from the front of the house back towards the kitchen.
We still need to move the chandelier. We have been ducking around it but now that we are sure we are happy with the new set up I can move it back over the dining room table.
My ikea desk has replaced the buffet that was here. It is a bit too small but it is a good place holder until something better comes along.
A few little changes but I am starting to see what I want this room to look like. I just wish I had a warehouse full of every type and size of furniture known to man so that I could try a bunch of options. Like a staging company but for regular people.
Cheers!
The chairs are from Fred Meyer a while back and the table is from Cost Plus. The rug is way too small. I bought one from Urban Outfitters but it was too big so I'm back to square one.
The sunshine has been making picture taking difficult but here is the view looking in from the front of the house back towards the kitchen.
We still need to move the chandelier. We have been ducking around it but now that we are sure we are happy with the new set up I can move it back over the dining room table.
My ikea desk has replaced the buffet that was here. It is a bit too small but it is a good place holder until something better comes along.
A few little changes but I am starting to see what I want this room to look like. I just wish I had a warehouse full of every type and size of furniture known to man so that I could try a bunch of options. Like a staging company but for regular people.
Cheers!
Monday, July 22, 2013
Building Built-Ins
The fireplace built-in project is finally catching speed. We've gone from this two months ago
To this
Sanding and paint is finished. I still need to calk the shelves and re-install the seats.
Look at all that storage! Out biggest hurdle at this point though is finding trim to match the fireplace mantel. So far I can't find it anywhere, so I'm pretty sure I'll have to end up tearing the original moulding out and replacing it all but I have yet to cross that bridge. A few more days of cure time and I can start loading those puppies up with books. Oh joy!
Who loves built in storage?? This girl!
Cheers!
Sanding and paint is finished. I still need to calk the shelves and re-install the seats.
Look at all that storage! Out biggest hurdle at this point though is finding trim to match the fireplace mantel. So far I can't find it anywhere, so I'm pretty sure I'll have to end up tearing the original moulding out and replacing it all but I have yet to cross that bridge. A few more days of cure time and I can start loading those puppies up with books. Oh joy!
Who loves built in storage?? This girl!
Cheers!
Friday, July 19, 2013
Lock and Key
Completing this project was great in two ways. First, it was nice to check off not one but two TBC items from my list and second, we finally have a door in this house that locks. Praise the lord!
With the change in the kitchen layout our master bedroom door is now right off of the back door. Which doesn't bother me a bit but when company is over it is nice to be able to actually close it. (We actually went about six months without a door at all but I knew that couldn't last.)
Since it was our master bedroom I splurged a bit on a doorknob and went with this brass beauty from Signature Hardware.
It's best feature?
A working lock and key! (My dream goal would be to replace all of our doors with new doors, but for now I've just been patching them up).
It's oh so fancy and a bit extravagant but I think it is the neatest.
So there you have it. Two more items off my list and some well deserved privacy.
Cheers!
With the change in the kitchen layout our master bedroom door is now right off of the back door. Which doesn't bother me a bit but when company is over it is nice to be able to actually close it. (We actually went about six months without a door at all but I knew that couldn't last.)
Since it was our master bedroom I splurged a bit on a doorknob and went with this brass beauty from Signature Hardware.
It's best feature?
A working lock and key! (My dream goal would be to replace all of our doors with new doors, but for now I've just been patching them up).
It's oh so fancy and a bit extravagant but I think it is the neatest.
So there you have it. Two more items off my list and some well deserved privacy.
Cheers!
Thursday, July 18, 2013
DIY Sliding Door
All week long I've been working off of this.
I add things as I see them, and check off the rest as I go. One of the projects I finally got around to completing was the sliding door in my bedroom.
I used this tutorial from Vintage Revivals, but I've seen them all over Pinterest. I followed the directions to the letter and it was about as easy as described. Unfortunately it is a two person project so enlist friends!
I hung the quilt I made behind it and moved the heart art to a different wall. Most of the time the door is open which obscures things a bit but I like the peak-a-boo aspect (and it was the only wall big enough. Ha!).
I did have to take down the original header (which was a bummer) but if your doors have simple trim you should be fine.
As to how I feel about it? Price wise it was perfect- under a 100$. Functionality wise? Well, it is heavy and hard to move and the sound of metal rubbing on metal is really loud. I waxed the pole which helped but even if you get the eye hooks perfectly centered the door wobbles enough to touch them. Also, I don't think the casters it sits on would work over carpet. At some point I will probably try a different tutorial for a sliding door (I want to do a matching one in the library) but since we are the only people who live here, the door is hardly ever closed anyway.
Anyone else attempted the sliding door with pipe? I like the look of it but the sound is just awful. If you've made it work I'd love to hear!
Cheers!
Emily
I add things as I see them, and check off the rest as I go. One of the projects I finally got around to completing was the sliding door in my bedroom.
I used this tutorial from Vintage Revivals, but I've seen them all over Pinterest. I followed the directions to the letter and it was about as easy as described. Unfortunately it is a two person project so enlist friends!
I hung the quilt I made behind it and moved the heart art to a different wall. Most of the time the door is open which obscures things a bit but I like the peak-a-boo aspect (and it was the only wall big enough. Ha!).
I did have to take down the original header (which was a bummer) but if your doors have simple trim you should be fine.
As to how I feel about it? Price wise it was perfect- under a 100$. Functionality wise? Well, it is heavy and hard to move and the sound of metal rubbing on metal is really loud. I waxed the pole which helped but even if you get the eye hooks perfectly centered the door wobbles enough to touch them. Also, I don't think the casters it sits on would work over carpet. At some point I will probably try a different tutorial for a sliding door (I want to do a matching one in the library) but since we are the only people who live here, the door is hardly ever closed anyway.
Anyone else attempted the sliding door with pipe? I like the look of it but the sound is just awful. If you've made it work I'd love to hear!
Cheers!
Emily
Linking up to:
Furniture Feature Friday
Wednesday, July 17, 2013
Dining Alfresco
One of my TBC's that I really wanted to finish was my little bistro area in the back yard. The original footprint was just a little too small.
You could only get two chairs out there and they were always being shoved on to the grass. This year I took the opportunity to move out all of the rocks and put down weed blocker. It took forever but finally we have a useable patio. We've had the chair set forever. I think Costco still carries them though.
My mint went crazy this year!
I love sitting out under the lights and enjoying the evening.
You have to enjoy Seattle summers while they last.
Cheers!
| September 2011 |
You could only get two chairs out there and they were always being shoved on to the grass. This year I took the opportunity to move out all of the rocks and put down weed blocker. It took forever but finally we have a useable patio. We've had the chair set forever. I think Costco still carries them though.
My mint went crazy this year!
I love sitting out under the lights and enjoying the evening.
You have to enjoy Seattle summers while they last.
Cheers!
Subscribe to:
Posts (Atom)
