Showing posts with label Christmas. Show all posts

Saturday, November 30, 2013

DIY Advent Calendar

Christmas is upon us! This year things are a little tight but I managed to get our Advent Calendar up and ready before the first.


I went with a simple, colorful design this year.


Each Advent is a scrap of 3" scrapbooking paper that I had, with a blank back for writing our sentimental sentiments on them. I decided against our usual advent to make things a little easier on us. Just a simple note each day. These are they types of advents I cherish the most.


Aren't the little clothespins the best?

The name of the game this Christmas is easy and fun and I think this meets those requirements. I'm still coming down from a delicious Thanksgiving with family but I'm looking forward to getting more Christmas up and out this week.

Cheers!

Friday, December 23, 2011

Merry Christmas Everyone!

Pinned Image
via

Hope everyone has a great holiday and finished off all of their lists. If you haven't My Publisher is having a gift certificate sale. 40% off through Christmas. I know I'm picking one up to make my Christmas album with (not an endorsement just a heads up!). I'm taking a break to spend time with love ones but I will look forward to seeing you in the new year!
Cheers all!

Friday, December 16, 2011

Holiday Mantle

My mantle has been mostly finished for weeks now but I was waiting for one last thing to arrive. My Christmas poster! A few weeks ago I was at Ikea and spotted this neat poster in the art section.
BILD Poster, collage #A Width: 27 ½ " Height: 39 ¼ "  Width: 70 cm Height: 100 cm
I thought it was really fun and graphic but it was way too big for putting on my mantle. Instead, I used Microsoft publisher and came up with this (let me know if you want the file. I'm happy to email it to anyone).

Instead of the random numbers that the Ikea poster had I used ones that meant something to our family. It has the date we were married, our birthdays, and the date we closed on the house. I used the Fedex online picture processing to have it printed out as a poster and used a 50% off coupon I found online. It ended up costing about $10. So not free but I wanted a non standard size. If you wanted an 8x10 you could just print it out from your computer which would be much cheaper. Here's how it looks on my now full mantle.

I went colorful this year and am loving it! All the bright ornaments popping out of the fresh greens just make me happy.

This glass Santa was a gift from a dear friend. Doesn't he look festive tucked in with my poinsettia?

Of course no holiday mantle is finished without stockings. Daniel and I made ourss a few years back (yes he actually sewed his own). Can you guess which one is mine?

I love my bright cheery mantle. It smells great with all the greenery and glows at night when the candles are lit. Definitely a winner! Now I just have to finish my Christmas shopping and all will be well.

Cheers!

Thursday, December 15, 2011

Shipping Out

Pinned Image

Getting everything shipped out to get there before Christmas! Hope you all aren't as behind as I am. 
Cheers!

Monday, December 12, 2011

My Second Favorite Holiday Tradition

Last week I shared with you our first holiday tradition: our advent calendar. This week we finished our second holiday tradition, constructing gingerbread houses. This is our fourth year making our houses from scratch and it was exciting as always. We have used the King Arthur Flour recipe every time and it makes the best construction gingerbread. For those of you who haven't made your own gingerbread houses, construction gingerbread is neither tasty nor soft. It basically bakes up like really good smelling cardboard. That's a good thing, you want strong walls to hold all of the candy you will be putting on. The recipe comes with a house template but we like to make our own. This year we were really ambitious (perhaps to our detriment). I chose to make a model of our house and Daniel designed a Tahitian stilt house.

The first step for construction was making our template. It helps to see how it will all go together if you are making anything intricate.


Kitty decided she wanted to help too, much to Daniel's amusement.

 Thanks Honey Bunch.

Normally house making goes pretty smoothly. This year however we both hit a few snags...


Needless to say Daniel's original design plans fell through (as did his roof and a few walls). Like the candy cane brace in the back?


I had a few mishaps as well but basically pulled though in the end. I didn't manage to get the overhang on the roof right but otherwise it is fairly close to what the top level of our house looks like only much shorter (and minus the candy of course).

I even included the covered front porch, painted floor and all. What house would be complete without two little gingerbread residents?

And a secret peek inside- our Christmas tree in the front room.

Even if there were a few flops this year it is still a great tradition. We made up some mulled wine and spent the day with quite the candy high. All in all, I call it a success!

Cheers!

Thursday, December 8, 2011

A Great Gift for any Wine Lover

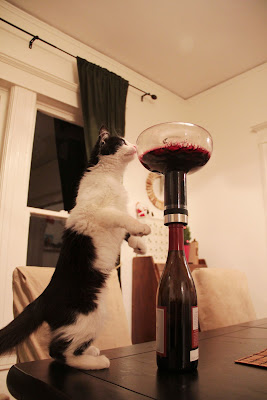
When my friends from Santa Cruz came in to town for Thanksgiving they not only brought copious amounts of wine but also a great housewarming gift (or two). The Menu Wine Breather.
via
 I love decanters. They are great for bottles that really should breathe a while but you don't really want to wait. Let's watch Daniel demonstrate.


As you can see the whole process was also very interesting to our not so little miss kitty. Can you believe how big she has gotten? I barely remember the tiny little thing I introduced you to two months ago.

Now, back to the wine. The aeration really helps cut the sharp tannic notes some wine can have. We always try a glass before and a glass after to see the difference. It can be astounding. Not all wine needs to be decanted but it is nice to have around for the ones that does. I certainly can't wait hours for my glass of wine! Pair with some nice glasses or a good bottle of wine and you have the perfect gift for the wine lover in your life (in case you are like me and haven't even started shopping yet).

Cheers!

Wednesday, December 7, 2011

Corking!

It isn't a secret that I love cork art (and that we drink a lot of wine) so obviously Christmas is not safe from my obsession. And after seeing this pin I knew I would work corks in to my Christmas decor.


The best thing about my version is that I didn't have to purchase a single thing to complete it! Here is my finished wreath


It was pretty easy to make, though the kitty thought the corks were her's to play with and that any moving ribbon was a toy. Once I had her corralled it went pretty quickly.

I started with an embroidery hoop I've been hanging on to for years


Then I gathered my supplies and lay out my corks to decide what pattern I wanted.


Then I started gluing.

Outside first


Then the inside


I decided I wanted a tuxedo bow so I cut my two lengths of ribbon and lay them in a cross


Then I folded in and glued the longer ribbon down


Then I did the same to the short one and flipped it over.


All it needed now was a tail and everything got glued on to the wreath. Super simple. 

I've got it up above my advent for now but things move around a lot in this house. Who knows where it will be tomorrow.


Who doesn't love free projects? 

Cheers!

Linking up to:
Frugal Friday @ The Shabby Nest 
Show and Share Day @ Just a Girl
Weekend Bloggy Reading