

Wednesday, November 30, 2011
Tuesday, November 29, 2011
Best Thanksgiving EVER!!!!
Morning everyone! Hope you all had a fabulous Thanksgiving filled with friends, family and food. Mine was just about perfect. The food went out without a hitch and I had fabulous company. Of course that meant I had no time to take any pictures what so ever (how does that always happen?) but it really was just a blast.
I know we are all transitioning into Christmas but I had to take a few moments to get some after pictures of my Thanksgiving decor before putting it all away. I had planned something more elaborate for our centerpiece (remember this?) but as I read more and more I realized that a simple low centerpiece that didn't get in the way of food or conversation would be best. This is what I ended up with

Just simple alternating little white and orange pumpkins with some orange candles in between. It was nice because it looked great before everyone got there and it didn't hinder the passing of rolls. As an added bonus I plan to turn my little pumpkin centerpiece into pumpkin bread this week.
Never fear though, I reused my branch candelabra for my mantle.

A word to the wise though, keep flammable things away from candles. That corn husk made quite the scene when it lit up.

I plan to switch out the white candles for red and add some greenery this weekend to transition this to my holiday mantle. I love the organic feel of the log and candles.
Anyone else still have their Thanksgiving decor up? I'm hoping to change that this weekend but we will see.
Cheers!
Friday, November 18, 2011
Thanksgiving Center Piece- Work in Progress
As usual, it started with a pin. This one to be specific from SAS interiors.

Isn't it fabulous? I just happened to have a pile of logs hanging around from redoing the back yard oh, 6 months ago (see Mom, procrastination is a good thing) and a drill bit handy. It is still a work in progress but here it is so far.


Just like the tutorial said, just drill some holes in the log of your choice and be done.

Nothing like using power tools to make a girl feel capable. I'm about 80% happy with it at the moment. Here are the things I might change before the big day:
- switch out tea lights for the tapers
- add a runner
- add more gourds
- add leaves/ pine cones
- change from plane white tapers to something more colorful
We'll see if anything much changes though. It is my first big holiday on our new house and the first holiday we've hosted since getting married last year so I'm stressing about getting everything perfect (which I know it wont be) but it is already shaping up to be the best Thanksgiving ever! Can't wait to show you all how it turned out. It is going to be a crazy week for me so I'm signing out early. Have a great Thanksgiving everyone! This wonderful little online community is definitely something I am thankful for.
Cheers!
Thursday, November 17, 2011
Dining room Makeover- Phase 1
I've been meaning to paint the walls in the dining room since we moved in. Remember their unfortunate shade of lavender?

Ok, so it is hard to see just how lavender they were but believe me, it was weird. One of those shades that looks blue sometimes and pink others. It is pretty but not really my color. In fact, painting it was the first on my list of things to do before Thanksgiving, so last weekend I finally got it done. I waited for the reveal because I needed to wait for the paint to cure to add my art. Here she is, the glorious after

Looking at them back to back you can really see how different the color is (it is BM Mountain Peak White). I also finally got the gallery wall of wine labels hung. (The wall looks a little yellower here than it really is but I was having trouble white balancing it)

When Daniel and I first met neither of us really drank but one of the first dates we went on was wine tasting in Santa Cruz at a place called Bonny Doon Vineyard. Daniel was drawn to them because one of the wine label artists was Ralph Steadman the illustrator of Fear and Loathing in Las Vegas. His labels were fun and dark and the wine was good.
We are still members of their wine club and try to save every new label they have (I have a lot more labels left to frame). We also add labels from bottles that mean something to us.

This Icardi label came from the bottle of Champagne we drank when Daniel proposed. I wish I could find more of it but I haven't seen it around anywhere.
I also started working on my centerpiece for Thanksgiving but more on that tomorrow.
Lists have been made, turkey bought, house in the process of being cleaned. We're almost there folks!
Cheers!
Linking up to


Ok, so it is hard to see just how lavender they were but believe me, it was weird. One of those shades that looks blue sometimes and pink others. It is pretty but not really my color. In fact, painting it was the first on my list of things to do before Thanksgiving, so last weekend I finally got it done. I waited for the reveal because I needed to wait for the paint to cure to add my art. Here she is, the glorious after

Looking at them back to back you can really see how different the color is (it is BM Mountain Peak White). I also finally got the gallery wall of wine labels hung. (The wall looks a little yellower here than it really is but I was having trouble white balancing it)

When Daniel and I first met neither of us really drank but one of the first dates we went on was wine tasting in Santa Cruz at a place called Bonny Doon Vineyard. Daniel was drawn to them because one of the wine label artists was Ralph Steadman the illustrator of Fear and Loathing in Las Vegas. His labels were fun and dark and the wine was good.
 |
| Cardinal Zin |

This Icardi label came from the bottle of Champagne we drank when Daniel proposed. I wish I could find more of it but I haven't seen it around anywhere.
I also started working on my centerpiece for Thanksgiving but more on that tomorrow.
Lists have been made, turkey bought, house in the process of being cleaned. We're almost there folks!
Cheers!
Linking up to
Wednesday, November 16, 2011

Tuesday, November 15, 2011
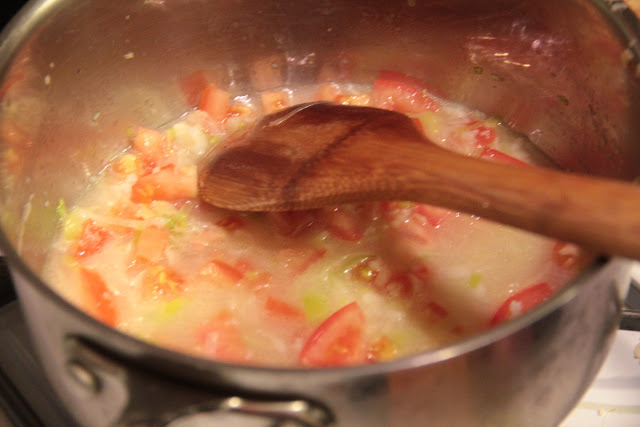
Good Eats Challenge Week 19: Mussels
So I've been dreading this Good Eats Challenge because I'm a little squeamish about shellfish (OK, I'm down right insanely picky about everything but that is what this challenge is addressing). So far on this first time journey I've had meatloaf (loved it!), shrimp cocktail (delicious!), and soup (not amazing but satisfying) so I figure there is a first time for everything. The recipe was exceedingly simple and easy to make and (i'll admit) not too bad.
Here's the recipe


Here's the recipe
Ingredients

- 2 tablespoons minced garlic
- 1 large leek, cleaned, trimmed, and chopped
- Pinch kosher salt
- 3 tablespoons olive oil
- 20 mussels
- 1 ripe tomato, seeded and chopped
- 1 1/2 cups white wine
- Chopped parsley
Hardware:
- 8-quart nonreactive, stainless steel stockpot
- Metal colander or steamer insert
Directions
In the stockpot, sweat the garlic, leeks, and salt in the olive oil until softened over medium-low heat.

Place the mussels in the colander and spray them with cold water to remove any excess dirt or grit. Remove any beards with a pair of needle-nose pliers.
Add the chopped tomato and the wine to the stockpot and turn the heat to medium high, and bring to a simmer.

Insert the colander of mussels into the stockpot and cover. After 3 minutes, check to see if the mussels have opened. If some are still closed, cover the pot, and cook for an additional 30 seconds. Discard any unopened mussels.

Place the mussels in a serving bowl. Remove 10 mussels from their shells and add them to the stockpot. Using a stick blender or a bar blender, puree the mussels until the liquid is of a sauce-like consistency.

Pour the sauce over the mussels and garnish with chopped parsley. Serve with a loaf of crusty bread.


Daniel was a good sport and tried them first


Since he didn't run out of the room screaming I figured they couldn't be too bad so I tried a few. I have to say they were pretty tasty. Some were more bitter than others but the sauce was really what made the dish. I think I ate half a loaf of bread sopping it up. YUM! All in all I say I wouldn't be afraid to try mussels again but I don't think I'd add them to my weekly menu. The sauce however would make a great stew base which I just may have to try one of these days soon. Anyone else tried something they didn't think they would like recently and found out they were wrong? I was shocked how much I liked the meatloaf (I know, weird right?) I'm thinking of doing an all Good Eats Thanksgiving this year. I'm working on the menu now.
Cheers!
Monday, November 14, 2011
A Simple Upgrade
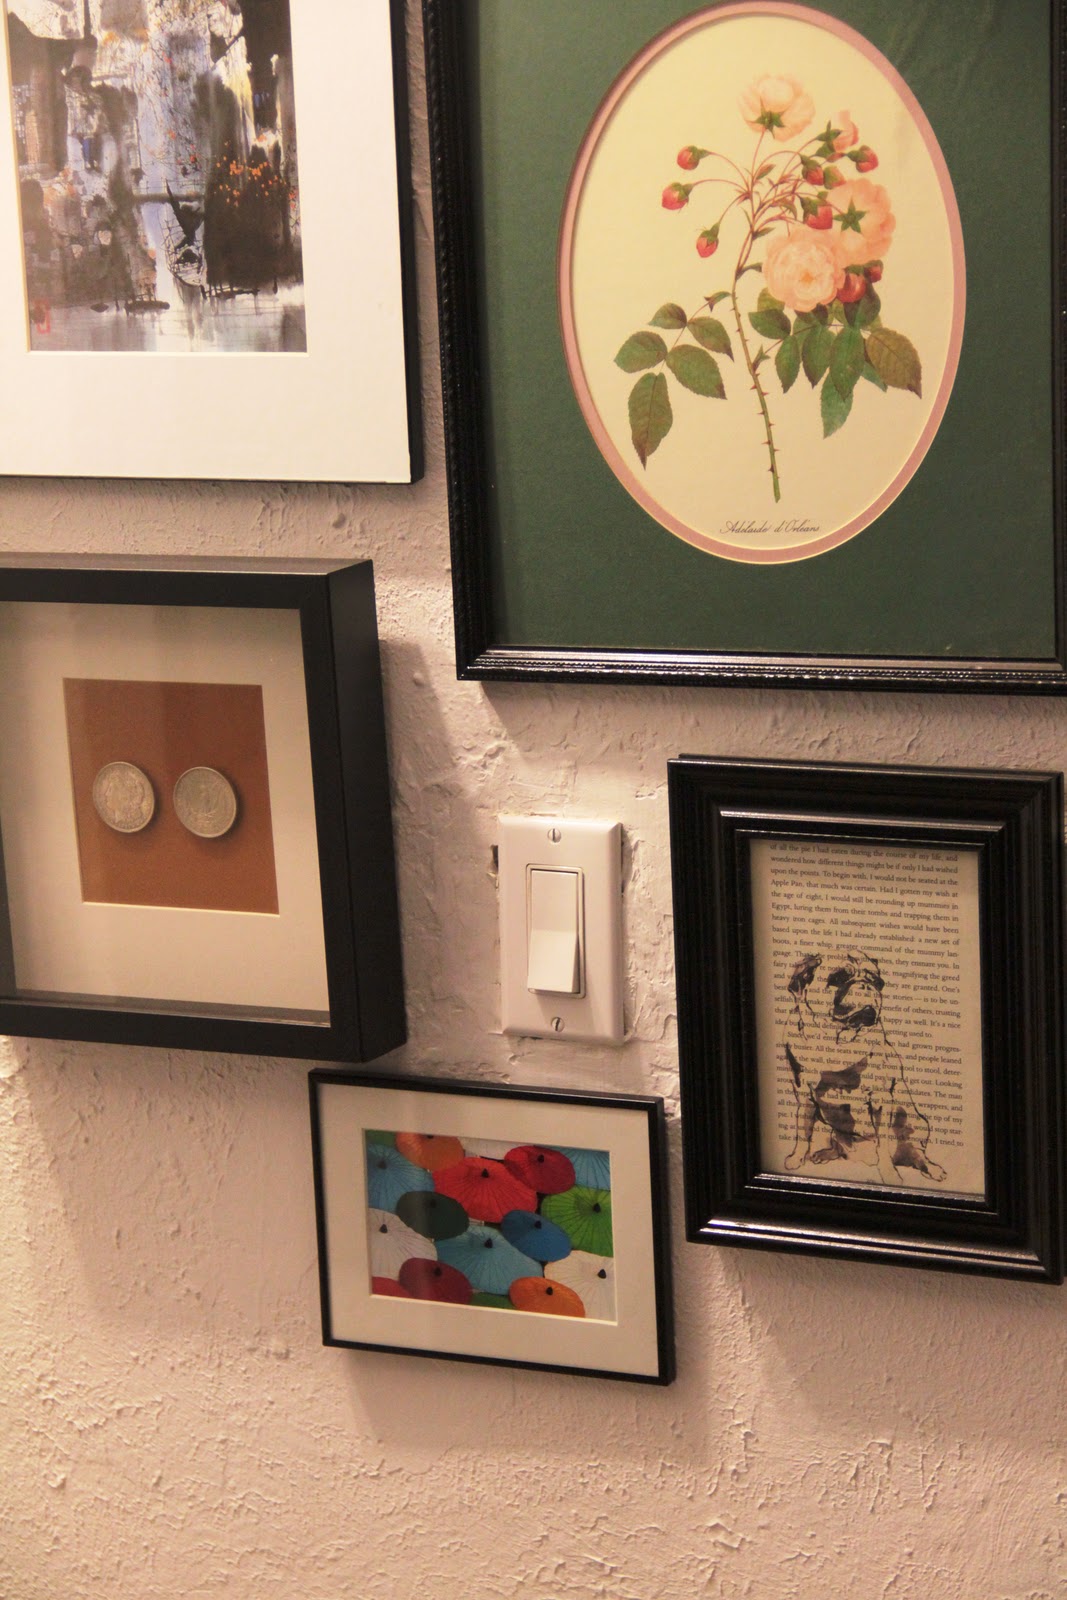
Hope you all had a good fall weekend. It has gotten massively cold up here (they even forecast snow later this week!) and I have been trying to get a few things done before guests arrive for the holiday. I have been doing some major work in the dining room so hopefully I'll be able to show that off later this week. But this, my friends, is all about the little things that can really make a difference. My gallery wall is slowly getting filled out but there was one thing that was bothering me.

Do you see it? No???? Here is a closer look.

That big white light switch was just creating a big piece of empty space. It has been bugging me for months so I decided it had to go. A $.99 black switch plate later now the whole thing is much better. The switch just blends in to the gallery of black frames.


It is like it is supposed to be there, nestled in between Daniel's Grandmother's silver dollars and my pug book page print. Who knew something so small could make such a big difference? Here's to easy fixes!
Cheers!

Do you see it? No???? Here is a closer look.
That big white light switch was just creating a big piece of empty space. It has been bugging me for months so I decided it had to go. A $.99 black switch plate later now the whole thing is much better. The switch just blends in to the gallery of black frames.


It is like it is supposed to be there, nestled in between Daniel's Grandmother's silver dollars and my pug book page print. Who knew something so small could make such a big difference? Here's to easy fixes!
Cheers!
Friday, November 11, 2011
30 Photo Challenge Week 4 (25-30)

Today is the last installment of the 30 day photo challenge and it was a bit of a doozy for me. I just could never get that last shot so I finished with 25-29 (see week 1, 2 ,3,4 here)
Day 25: Something pink. Honey could have been my pink, close up and black and white this week so it was hard to pick which one she would stand in for but look at that cute little pink nose!

Day 26: Close UpMy guinea pigs don't get featured much but I love the little squeaky things.

Day 27: Far Away The peak-a-boo view we have of the sound from our front porch. So far away...

Day 28: Flowers My beautiful Japanese Anemones I planted.

Day 29: Black and White This one speaks for itself I think.

I had a lot of fun doing this challenge. Thanks to Michelle at Ten June for setting it up for us! Make sure you stop by and check everyone out.
Thursday, November 10, 2011
Another One Bites the Dust
I finished putting up my gallery wall ages ago (see here) but characteristically haven't finished filling my thrift store frames with new art. Enter this lovely little DIY paint chip art I saw featured on Suburban Spunk a few months ago.

It is super easy to make and you only need a few supplies.
Supplies:

I liked the way mine looked on the diagonal so I made it larger than I needed and trimmed the excess. It was easier than trying to make everything perfect from the start. Then I just popped it in a frame I already had and hung it on the wall.


It is super easy to make and you only need a few supplies.
Supplies:
- Paint chips in the color scheme of your choice (mine all reflect my inspiration pillow)
- Cutter (a slide cutter works best- I cut my strips to 1/4 inch)
- Spray adhesive
- Blank card stock
- Frame
The most time consuming aspect is cutting. After that just lay your card stock out and spray it with adhesive before arranging your strips.

I liked the way mine looked on the diagonal so I made it larger than I needed and trimmed the excess. It was easier than trying to make everything perfect from the start. Then I just popped it in a frame I already had and hung it on the wall.

That flower still needs to go but my wall is getting ever closer to being complete. Here's to hoping it is finished soon.
I just realized today that I basically have two weekends before my house is full for the holidays so I have a full day ahead of me with running errands. Luckily one of those errands includes IKEA (I love having one close!). I'm hoping to bang out my decor this weekend and get things ready for the festivities. I'm starting to get excited again so I'm on a mission to get things done! Big step this weekend is painting the dining room (nothing fun just a nice neutral white to get rid of the lavender). Anyone else have big plans for the weekend? This week's Good Eats Challenge is mussels and I'm not going to lie, I'm a little freaked out by it all. I'll let you know how they turn out.
Cheers!
Wednesday, November 9, 2011
Put a Feather On It
I pinned this picture a while back and finally got around to putting it together.


Show and Share Friday @ Just a Girl
Beneath My Heart
The blog is in German but her tutorial is really easy to follow. She took great pictures of all of the steps and really broke it down nicely.
Here is what you need
And this is what you end up with

I have gotten so many complements on it so far and it took about 10 minutes to make which I love. I could see this being a great Christmas present for your fashion forward girl friends. What I love even more about the necklace is that I made it using feathers that I have been carrying around for 10+ years.

When I was young we lived next door to an older woman named Nancy. Her house was a zoo with parrots and toucans and dogs and cats of all sizes and shapes (she even had a pot bellied pig for a while). I used to visit when I was young to play with the animals and as I got older I would help her with chores. When a bird lost a particularly beautiful feather she would save it for me and I have been saving my favorites for years. She passed a few years ago and I still miss her so having something to remember her by is great. I love that I can wear my feathers and think of her. It is amazing how people can really touch you life.
Anyone else get overly sentimental about strange items? Nancy loved Christmas most of all so I think about her a lot this time of year.
Cheers!
Linking up toShow and Share Friday @ Just a Girl
Beneath My Heart
Tuesday, November 8, 2011
Good Eats Challenge Week 18: Post Thanksgiving Soup
Ok, I know I'm jumping the gun like Peir1 here on my holidays but I had leftovers and I wanted to use them up. Since it was a great soup it will definitely be added to my arsenal for post Thanksgiving leftovers. It is super straight forward and has very little steps (in fact I hardly took any pictures because let's face it, boiling water isn't that interesting).
Here's the recipe

Here's the recipe
Ingredients
- 2 quarts vegetable stock
- 1 turkey carcass
- 1 (10-ounce) box frozen mixed vegetables (I used Trader Joe's Soyccotash)
- 1/2 cup rice
- 2 cups cooked turkey, cubed
- 1 teaspoon Old Bay seasoning
- 2 teaspoons dried thyme
- Salt and pepper, to taste
Directions
Combine the vegetable stock and the turkey carcass in a large soup pot over low heat and bring to a simmer. Cover and simmer for 1 hour.
Add the remaining ingredients to the stock. Cover and simmer for an additional 20 minutes.
Remove the bones before serving.
Told you it was simple. I halved the recipe and used duck instead of turkey because that is what I had, but it would work well for any poultry. It was a little gross boiling bones but the house smelled so deliciously of duck that It was worth it. Seriously, I would make duck candles if I could. The pièce de résistance was the duck skin chips I made to top it off. I saved all of my duck skin and put it on a foil lined pan with a baking rack on it (this holds the skin up away from the fat that melts making it crispy). 5 minutes in a 400 degree oven and you have the best kind of bacon ever.

It was warm and satisfying. Just what I need now that the temps have been dipping down below 40 at night. Yum! I know duck is not usually a staple in most kitchens but give it a try, you won't be disappointed.
Monday, November 7, 2011
What a Weekend
I think the kitty sums up my feelings exactly...


Sleepy, unmotivated, and basically stuck in a rut (though she is way cuter about it than I am). I've been working more as the holiday season picks up and I have no energy to do anything. Added to the top of that I am hesitant to start any project that I am not absolutely sure will be done before my Thanksgiving guests arrive. I have a few projects that are partially done (aka strewn about the house) so hopefully finishing them will help boost my energy back up. Anyone else feeling the post Halloween pre craziness crash? The holidays are coming, are you ready for them?


Sleepy, unmotivated, and basically stuck in a rut (though she is way cuter about it than I am). I've been working more as the holiday season picks up and I have no energy to do anything. Added to the top of that I am hesitant to start any project that I am not absolutely sure will be done before my Thanksgiving guests arrive. I have a few projects that are partially done (aka strewn about the house) so hopefully finishing them will help boost my energy back up. Anyone else feeling the post Halloween pre craziness crash? The holidays are coming, are you ready for them?
Friday, November 4, 2011
30 Day Photography Challenge (20-24)

Back again with this week's photos (here are week 1, 2, and 3). I've moved away from taking deliberate pictures each day and have started just thinking about the things that I want to capture more clearly. I can really see how I am thinking more purposefully about photography and less just trying to take pictures. So, without further ado
Day 20: Bokeh


Day 21: Faceless self portrait

Day 22: Hands

Day 23: Sun flare


Day 24: Animal


As you can see I was having trouble picking just one this week, so I let myself have two. But really, how could you say no to that face??? Can't wait to see what else everyone has this week.
Cheers!
Subscribe to:
Posts (Atom)