Thursday, August 4, 2011

Construction Part 2: Fencing

Building the fence was probably the most rewarding part of this whole back yard process. That is probably because it was also the final step in the construction phase. It was also seriously confusing. Building a fence on a sloped property can go two ways: angled or stepped. You can see which one we chose. 

Here's why:


See that white car to the left of the frame? That is where our neighbors park their car. Unfortunately for us their land is slightly higher up than ours (the street slopes down to form a V with us basically at the bottom). They are about 6 feet higher than us which meant unless we stepped the fence we would basically look at their car all the time. And you know how much we are in to our privacy around here (as evidenced here and here). Of course, when we put the posts in we put in standard sized fence posts not thinking how it would look with the lattice hanging out over the top. Not pretty (I was so disgusted by it I didn't even take a picture in my rush to get to Home Depot for a remedy).  You can probably tell the solution by the next picture.

No? Basically it involved two things, those metal brackets on the posts and the 1X4 across the top. Before I added the extra length to the posts they ended at the brackets. You can imagine how awkward the fence looked with 3 feet of lattice floating unfinished on top (not to mention unstable since it flapped in the wind every time it blew). The 1X4 across the top gives it a nice finished look which made me happy.

As to how the rest of the fence got made, we ended up with enough usable boards from the old fence to construct the new one. It actually made things easier than buying pre-made fence panels because the slope would have made anything pre-made a struggle to fit.

After sorting through the wood we had we cut each piece down to fit the panel it was for. The slope made this a little difficult but we just tacked the lattice up first and then lay the boards against the lattice and marked how tall they should be. Once they were cut down (and numbered so we knew which one went where) we screwed them in to two 2x4s. We traded off jobs so that one of us cut and while the other drilled.
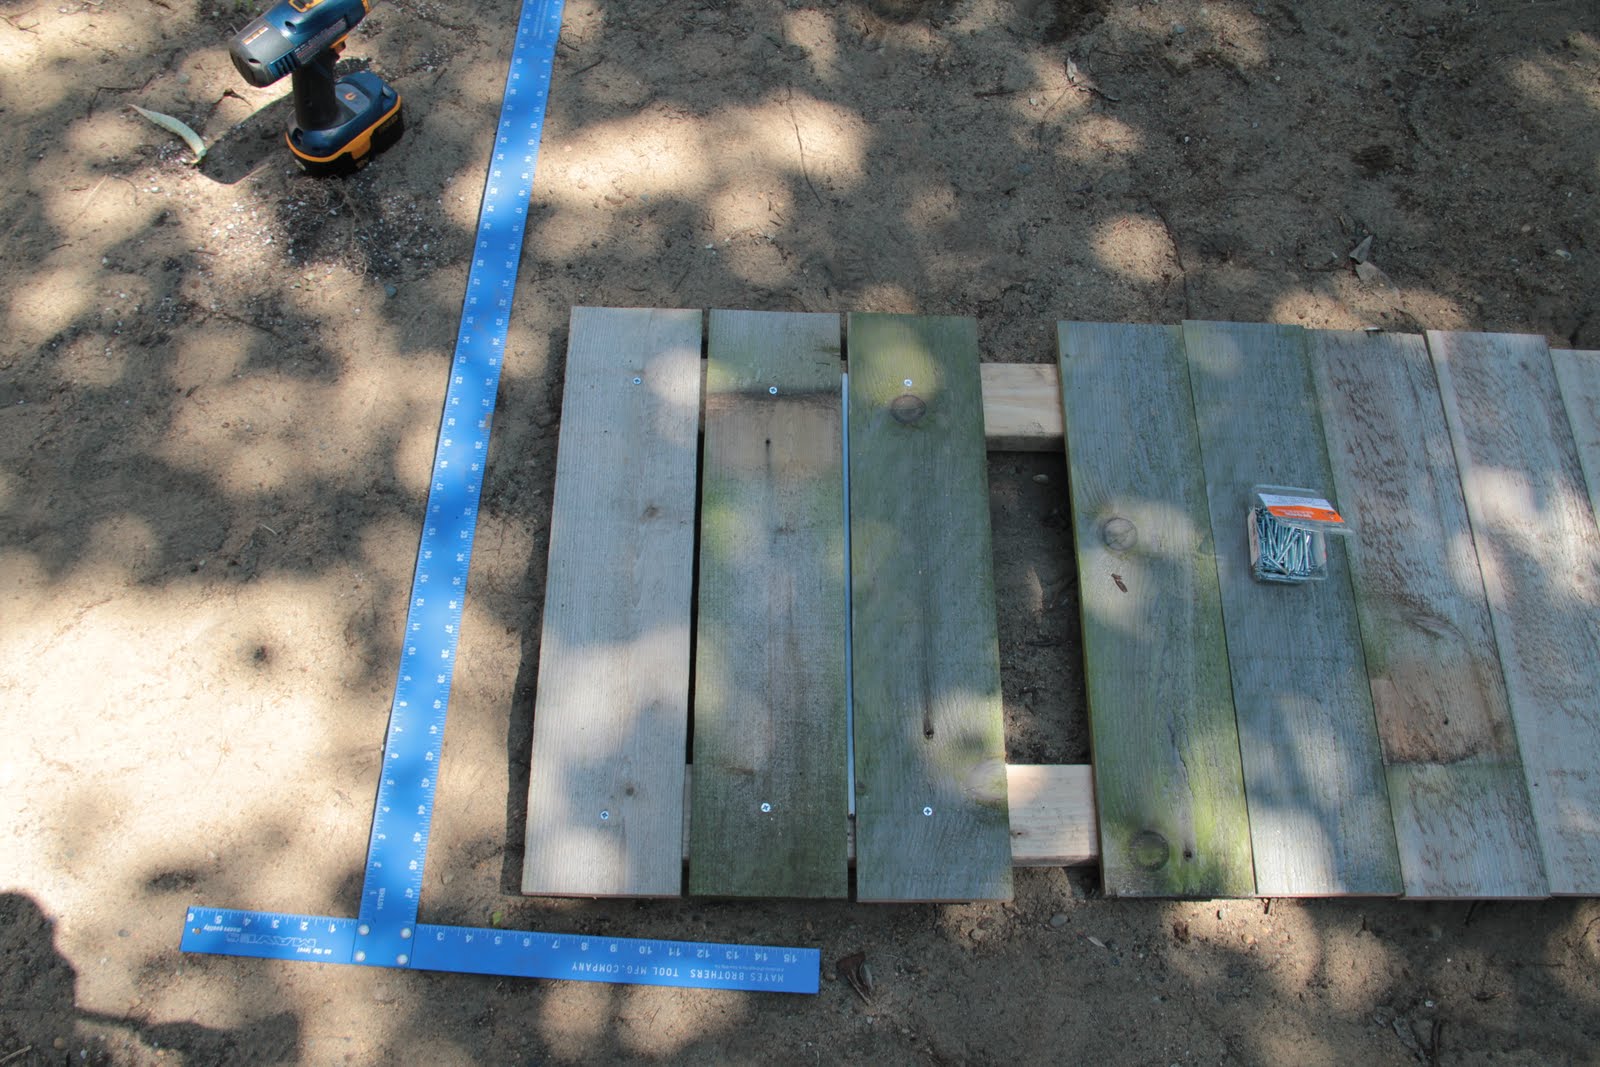

To get the spacing right I used the cover of our pruning saw as a spacer (that little white strip between the boards).

Once the panel was complete we screwed it in beneath the lattice and were done. You may have noticed we didn't put up the 1x4s on the back fence. That was on purpose. We have bamboo planted there and we wanted it to look as natural as possible. One day we will look out our back yard and not see that house behind us. Thankfully bamboo grows fast. All the shoots above the fence line have come up since we moved in three months ago.

Not only was using the reclaimed wood economical (we only had to by the lattice and 2x4s) it saved us the hassle of hauling the wood away and personally I like how it looks. The boards are all different colors and it adds an almost rustic feel to the whole thing. I'm hoping to get the place cleaned up and planted this weekend since my parents are coming for a visit and then my mom and I are off on a road trip. I have a whole list of things to finish before they get here including painting and finishing the downstairs bath. Today however I get to go into my sometime work and play with chocolate to get ready for the upcoming holiday season. I'll post on that soon.

Cheers!

Wednesday, August 3, 2011

Construction Part 1: Terracing

 Going from this

To this

wasn't as hard as you'd think (ok, it was hard, but mostly strength wise not difficulty level). I would definitely do some things differently next time but by the time we got to the last level we had a pretty good system in place. 

Obviously, the first step you should take is figuring out the change in elevation (I say you because this wasn't our first step and caused a few problems down the road). You need to do this because it tells you how many vertical feet you are going to have to have terraced. This translates to how tall each level needs to be. When we finally got around to doing this (level 2) we used the "measuring with a line level" method detailed in Sunset's Hillside Landscaping book which was my bible for this project. 

scanned from Hillside Landscaping
As you can see it is pretty straight forward. The most difficult thing was being tall enough to measure the distance between C and B. 
Our Process:
We tied a length of string to the bottom of the fence at the top of the hill and went to the bottom of the hill. Then we raised the string up until the line level (a cute little thing that hooks on to the string) was level and then measured the distance between the ground and the string. We totaled about 80 inches if we wanted to level the whole thing. That means that if we wanted to dig the whole yard out flat we'd have a 6 foot 6 inch retaining wall at the very back. Since Sunset didn't recommend making a wall over 3 feet without a contractor this wasn't going to work for us. We also had an existing staircase to work with so we knew we'd need a few levels. We ended up going with a part terrace part natural slope to get our total height requirements. 

The actual terracing was the most work. Each level needed to be dug out flat before the next step could be made. 

It required moving a whole lot of dirt but I counted it as my workout each day I dug so it all worked out (shoveling gives you killer arms and abs by the way).

Once we had the first level flattened out we built the terrace using 4- 4x4 pressure treated posts and 4- 8X12 lengths of boards. In retrospect I should have done more research on the type of board we should have used but if they rot away in a year I can replace them pretty easily without disturbing the rest of the structure. 

By the second terrace we had come up with this method and it worked well for us. We constructed the whole wood part on the ground, leveled and screwed all the boards into the posts before putting it up. Then we just dug our post holes and dropped the entire structure in. Obviously this was a two person job. (Here's one half done)

This was easier than putting the posts in first for us because leveling the whole thing was really difficult one board at a time and we didn't want to deal with having to bolt the boards to the posts from the front. This way everything is attached but no hardware shows. 


As you can see we ended up with the four levels but I decided to leave the last level more sloping like the natural hillside was. I was worried the terraces would look too modern and stark so we are going to plant the heck out of that back corner and make a nice little jungle in there. Something lush against all that wood like I showed you in this concept post. 

So there you have it. If you plan to do something similar I highly suggest reading Sunset's Hillside Landscaping. I got it at my local library and it is full of ideas and inspiration. 

See you tomorrow to see how we built our fence.

Cheers!

Tuesday, August 2, 2011

All Fenced In

Well my friends, it's official. We have completed all the major construction projects for the back yard taking it from this


to this


We were rained out on Sunday so Daniel and I spent all Monday afternoon finishing the fence. I am so happy to have it finished! I let the dog out this morning and didn't have to sit and watch him to make sure he didn't escape. Now I can tick one more item off of my to-do list.

Back Yard Makeover To Do:

  • Clear brush 
  • Build terracing
  • Put up/build fence DONE! 8/1/11
  • Plant grass
  • Build a shed
  • Paint and re screen screen door
  • Paint back door
  • Take out AstroTurf on back porch and refinish
  • Decorate porch
  • Put in lighting along the walk way
  • Fix porch light
  • Plant upper planters
  • Plant Laurel hedge
As you can see there is still quite a bit left to do but I am ready to get most of it done. Planting grass is next since that will take some time to take root and I want it well established before winter comes so planting the rest will come later (probably next month). 

I'll be back with a breakdown of what went into the process for those interested but for now I'm enjoying my finished fence. 


Cheers!


**Check out these other Before and Afters and Thrifty Decor Chick.

Monday, August 1, 2011

DIY Colorpath Pillow

I have an abundance of scrap fabric that has been taking up space and I love any project that can help me get rid of it (and make something pretty too!) so I turned to the trusty internet to find a good rainy day project.

Jessica at Sew Homegrown gave me the inspiration to make knockoff this pillow (she wrote a great tutorial too). Here's hers.


Here's my finished product


Mine isn't as ruffly as hers looks but I'm loving the texture and color. 

I chose my fabrics based on, you guessed it, my inspiration pillow. I love this thing, it really is helping me make design decisions. I picked through my scraps and pulled out the ones that looked good with the pillow.


Once I had them arranged my my liking I used my round cookie cutter to trace 2" circles. 


This was seriously tedious and took about 2 episodes of NCIS to cut all 60. After they were cut out I stacked them together and lay them out in two lines on my pillow fabric. 


I scooched then around and pinned them down where I thought they looked good being careful to make sure the circles were all slightly uneven so they would show later.  I attached them by simply bar tacking them down with my sewing machine. It took probably 1/3 of the time to actually make the pillow as it did cutting all the circles. (I made my pillow using the envelope method and the fabric is a heavy white linen).


See how well it complements my inspiration pillow. One thing I would recommend if you make this pillow is to draw straight lines where you plan to put your scraps so that they are straight. Mine are a little crooked. 

Pretty!


Cheers!

Linking up to Metamorphosis Monday at Between Naps on the Porch, Beneath My Heart, Serenity Now,
and the Pinterest Challenge brought to you by Young House Love, Bower Power, Emily Henderson, and Making A House A Home.

Weekend Bloggy Reading
***Norman had to put his two cents in, check out his reaction to my hard work at the Book of Norman

Thursday, July 28, 2011

How do I Love Thee?

You might have noticed from my yard inspiration pics here that I have a soft spot for hydrangeas. Particularly light blue ones. This is probably because they featured heavily in our wedding plans. I even made my own light blue hydrangea bouquet


and the park where we got married (you can read all about that special day here) had some GORGEOUS blue hydrangea bushes


Ever since we started looking for a house I have been dreaming about planting my very own blue hydrangeas but I haven't found any at the nurseries that were the right color. This is what I'm hoping the backyard will look like

What do you mean that doesn't look realistic at all? Ok, I don't have much any photo shopping skills (or Photoshop for that matter) but this is my best approximation of what I want. Wouldn't it be lovely to have huge bushes of hydrangeas in the back? I think so. I can't wait to get this back yard going but I know It will be awhile before it is as lush as I'd like. Here's to hoping!

Hope everyone has a fabulous weekend! We're working on getting the fencing up and I have a few little projects I worked on this week that I still need to write tutorials for.
Cheers!

What's Next? Backyard Edition

Now that we are done with the terracing we have been taking a little break and figuring out what is the next step on our to do list. That being said, I thought I'd share it with you. Don't you just love lists? I've got like 5 going right now.

Back Yard Makeover To Do:
  • Clear brush 
  • Build terracing
  • Put up/build fence
  • Plant grass
  • Build a shed
  • Paint and re screen screen door
  • Paint back door
  • Take out AstroTurf on back porch and refinish
  • Decorate porch
  • Put in lighting along the walk way
  • Fix porch light
  • Plant upper planters
  • Plant Laurel hedge
Akk! Writing it all down makes me feel all overwhelmed again. Let's just look at some pretty planting inspirations instead


Hydrangea Walkway, Santa Cantarin, Brazil
 photo via Lajacaranda
here
here

See that's why I am doing all this work. This will be a yard to be loved for years to come. Positive thinking people!

Cheers!

Wednesday, July 27, 2011

You Can't Have Too Much Privacy

I have never liked that the first thing I see as I come up the stairs to my front door is this


That my friends is my neighbor's bathroom window. This is what I get for living in the city. Here is what I see leaving the front door.

They just added that lovely new balcony that can now see in my living room windows. **sigh** Luckily I love my house and where I live so I decided to just block them out! We were already buying lattice for the back yard so I grabbed an extra sheet to use for this project.

First I measured the bottom of the opening and cut the lattice down. Then I stuck it up in the space

and traced the archway. After I cut that down I did the same thing with the little bit on the top (I used just one whole 4x8 lattice for this project).

Next I pulled out a leftover can of white trim the previous owners left behind and got to painting


Like my state of the art tarp? That is the old shower curtain from the downstairs bath that was here when we moved in. It was easier to paint standing up so I moved it around to work that way. I'm working on the front porch because I didn't want the dust from the back yard all over my paint job.

Once everything was painted and dry (it took two coats for full coverage) I attached it to the space with some L brackets. Here are some before and afters for you (so you don't have to scroll back up)

Before


After

Now the other way

Before

After

Much nicer! I does make the space a little darker but it is worth it to have the privacy. We are planning on getting something to grow up it to make it even prettier.

You can see I've spiffed up the entry way and changed the old pennant banner that was there before. I found that rusty metal ring in the back yard and thought it was neat. Since the paint was free the total cost of this was 23$ for the lattice and 3$ for the brackets. A nice 26$ makeover if I do say so myself!

What about you? Are you a big privacy freak like us? (this isn't our first privacy screen, see that here) Or do you just let it all hang out?

Cheers!

Weekend Bloggy Reading