Showing posts with label Bathroom. Show all posts

Thursday, June 6, 2013

Compl....ete?

I have for you an almost complete bathroom before and after. Why isn't it complete? Time is a tough mistress.  Still, it is worth taking a peak.

Before


So Far


We didn't move much plumbing (the sink skooched over about a foot) so the shower and toilet are in the exact same spots. I think it helps highlight just how much we changed things.


Obviously paint needs to happen and trim but otherwise things are done. I am so happy to be finished with this project! This is my favorite project so far. I think mostly because of just how much we changed (for the better!). It is really easy to look back and see how worth it it was. I love before and after photos don't you?

Why the sort-of reveal? Daniel and I are off to La Paz, Mexico for a family reunion this week. As you read this I am winging over CA on my way to sun and sea so things might be a little quiet around the blog this month. I've got a few little posts lined up but we will be back and wrapping up the bathroom in July.

Cheers! 

Tuesday, June 4, 2013

Shower!

Bam!


I'm hoping for a full reveal Thursday but I am too giddy with tile completion not to share this. Drywall is almost finished, toilet is in and the sink is ready to go. I can see the light!

Wednesday, May 29, 2013

Paint Colors

Why is it so hard to choose a paint color? These are the ones I'm working with.


Left to right: SW Ice Cube, BM White Diamond, Behr Frostwork. Not that you can really tell the difference.

I want something bright since the bathroom is windowless but I worry it is too light. Once the drywall taping is done I'll be able to get a better feel for how things are coming together but for now I'm leaning toward Ice Cube. It reads blue, grey, lavender in real life which is a little outside of my normal box but not too far.

There has got to be an easier way to pick paint. Any tips?

Cheers!

Thursday, May 23, 2013

Grouting- The Final Frontier

This week I tackled grouting our bathroom floor. Not going to lie, I was scared. Really scared. But I pushed through and it all worked out in the end. Here are a few tips.

1. Take the time to make sure any mortar that pushed up through the grout lines is removed. This takes forever but it is worth it.


2. Work in small batches. I did 2 cups of grout mix at a time. which was about 1/4 of our 42 sq/ft bathroom floor.

3. Be prepared. Get everything ready and have extras. Extra gloves, water, etc.


4. It's going to be messy, and that's ok.

This was the scary part. I had my beautiful clean tile and then I dumped grout on it. (below you can see all three phases. Clean in the upper left, hazy in the upper right and freshly dumped grout on the bottom)


And then I freaked out.

Yeah. Not very pretty. But keep going. Just like the instructions say (I liked this series of tutorials btw) keep working that grout in to the grout lines and scraping away. It looks like a mess but it will clean up. I promise.

5.  Walk away. This was the hardest but, because I was working on the floor, I couldn't grout the whole thing at once if I had any hope of getting back in there to clean up. So I put my 2 cups worth of grout down, spread it around and then walked away for 15 min. That gave the grout time to set enough that I could form my grout lines (for a good explanation of this you can watch the video) and clean up. It still wasn't pretty but don't worry.

The first day I did half the floor, cleaned as much of the grout off the surface of the tiles as possible with my sponge (there was still a back haze) and then went to bed. When I woke up in the morning I used a damp sponge to clean off the last bit of haze. If you don't wait for things to dry a bit you just pull up the grout from where you want it and spread it around the top of the tiles. No good.
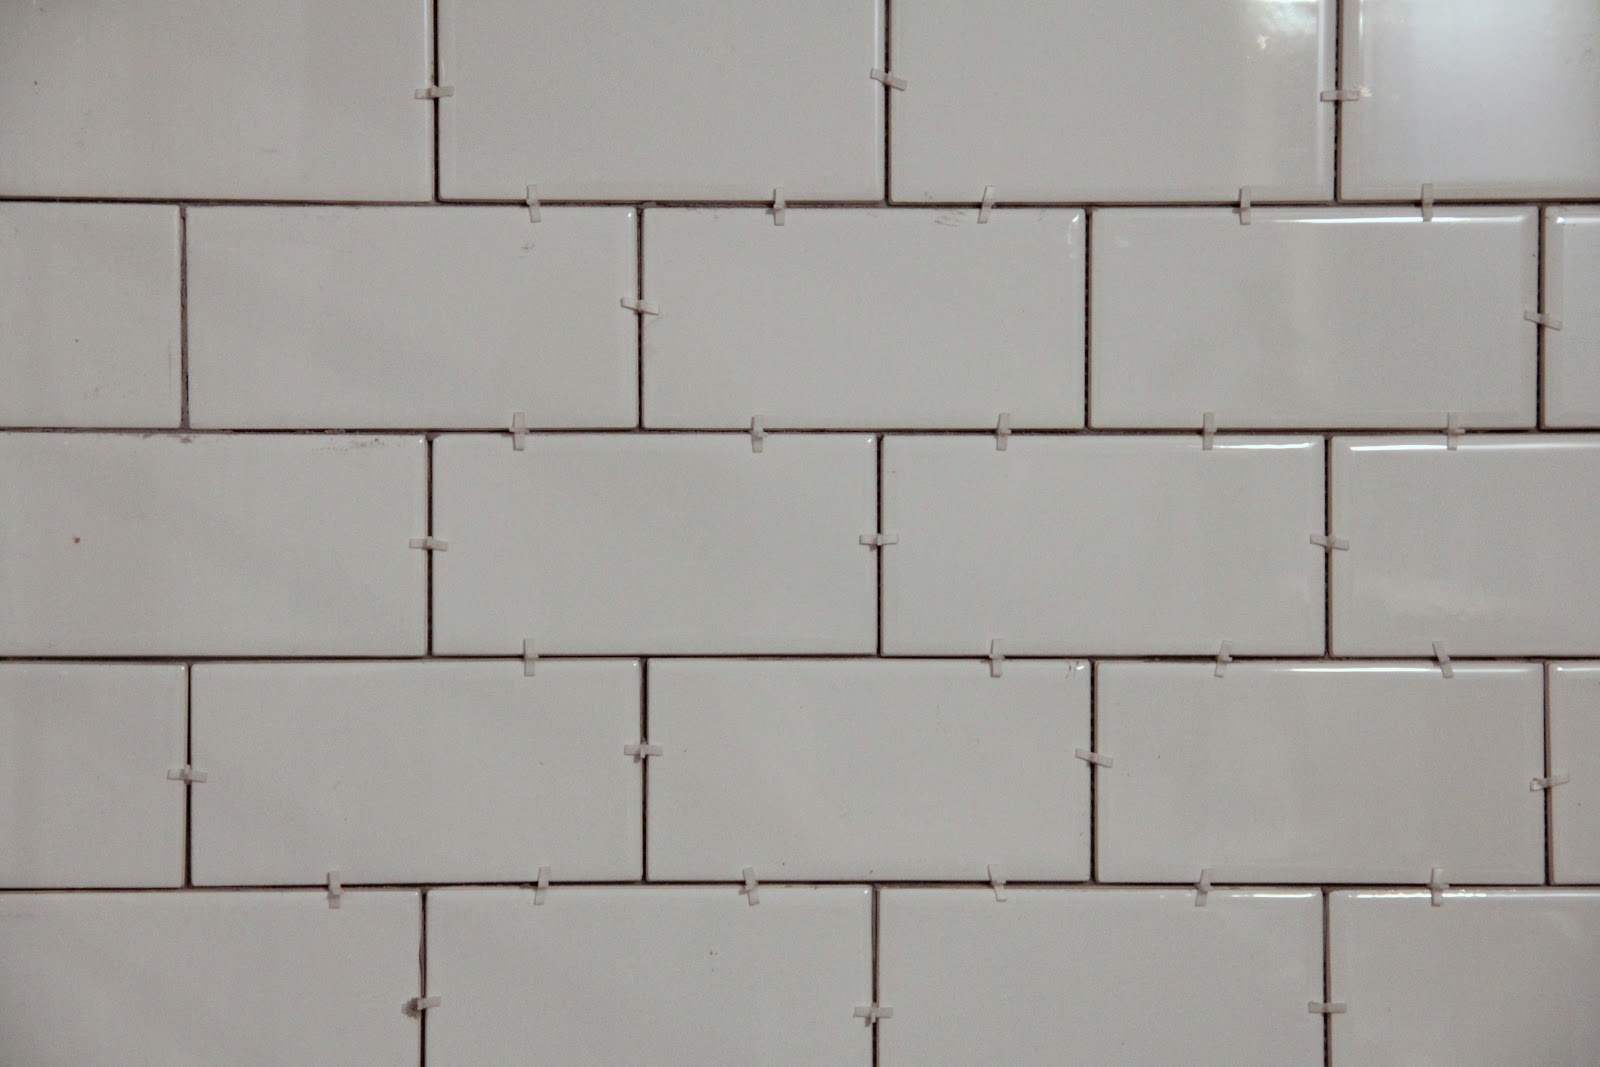

So pretty right?


It took two days but only about 3 hours of actual labor. Lots of waiting. Don't rush it. I still think it is scary (how on earth will I manage a vertical surface- the grout is like pudding!?!?) but at least now I know it can be done. We are tackling the shower this weekend so I'll let you know how it goes!

Anyone else have grouting tips? This was my first experience with mixing my own grout and it is a lot more liquid than the pre-mixed stuff. Good for the floor but I'm curious to see how it works on the walls.

Cheers!

Materials

Tile- Black and White Basket Weave from The Tile Shop
Grout- Un-sanded grout from Home Depot in Charcoal

  Weekend Bloggy Reading

Wednesday, May 22, 2013

Tiling- The How and Why

Now I preface this by saying we are not master tilers nor is this necessarily the best way to go about things but this is the method that worked for us.

Because Daniel is a computer guy, we started with math.


Our shower wraps around three walls so we wanted our pattern to move smoothly from one side to another with the least amount of cuts (cutting tile is a pain). Math let us see exactly how many tiles we needed and how many part tiles we needed for our first row.

Then we pulled out our new best friend. The laser level.

This ensured that everything stayed straight and lined up. No drifting!

Then we started tiling.


Realistically you could have started here but it helped to have some plan of attack. I didn't get a picture but we actually started at the height of the shower ledge (about half way) and tiled down. That made us sure that the most visible section (the ledge) would be a full tile instead of a partial tile. You can see in the above picture the laser level showing the horizontal and vertical lines (in red). That saved us from so many "are you sure that's level?" and "that doesn't look straight to me" arguments. The level doesn't lie my friends.

Once we got the lower half of the wall figured out the rest of the pattern followed. It probably took 1-2 hours just to get that first row down between the math and the staring. On our first day we only finished the back half of the wall. Day two took us to the left half and that was basically the weekend. Last weekend went a bit smoother. By the end we had made it to 99%


Why didn't we finish? We ran out of edge tiles. I grabbed another case this week and we should be ready for grout by the weekend.

So there you have it. Our third tile laying experience. It was definitely a lot easier this time around but it still took a lot of patience and planning (things I have trouble with) and a lot of mortar. Like way more than I thought we would need.

Hopefully that helps those of you on the fence about a big tiling job with your decision. It isn't rocket science, but it can seem that way. Seeing how the quotes we got for someone else to do the job were around $1,700, my $500 tile job is perfect in my eyes.

Cheers!

Monday, May 20, 2013

Stick A Fork In Me

I'm done! More to come on the how and why but for now I am happy to be basically finished tiling our downstairs bath (here are the original plans if you need a refresh).


I ordered the floor tiles today and plan to start grouting this week. We are inching closer to a shower people!

Anyone else knee deep in a project? I can see the light at the end of this tunnel and I am so excited for the finished product.

Cheers!

Tuesday, May 14, 2013

TBC- To Be Completed

I have a problem. I like to start projects and then not finish them. It has gotten so bad that I currently have 14+ projects that are half done. So, in an effort to make myself accountable here they are. I'm laying it all out there. Don't judge people.


Or the trim in the kitchen Complete! 7/19/2013

This sliding door project for the bedroom? Nope, not done. Complete! 7/18/13

Apparently I don't like painting around trim. COMPLETED! 3/27/13 

Ceilings aren't much fun to paint either. 

That hole in the ceiling has been there 2 years.  Complete! 7/10/13

We moved the chandelier. Never patched that hole either.  Complete! 7/10/13

That's supposed to be a light switch (in my defense, this is a Daniel Project) COMPLETE! 6/2/13

I started the built-ins. Got hung up on sanding. 

My new porch gate still needs paint. COMPLETED! 3/21/13 

We never finished fixing the crack in the kitchen ceiling. 

The hood still isn't vented (**cough, cough 8 months later cough**)

I never installed the trim around the cabinets in the kitchen. 
I never actually finished painting the kitchen cabinets. 


Our bedroom door doesn't actually close. We should get on that. Complete! 7/19/13

I have a new light for this room that is gathering dust. 

I need to add more rocks to my newly expanded patio. Complete! 7/17/13 

I never got around to installing that rain barrel I bought last year. COMPLETE! 5/29/13 


Daniel and I have made a pact to not start anything new until everything else is finished. Things are going to get pretty boring around here for a while. On the plus side This is all slated for after the bathroom is finished (since that is number one priority) so you still have a few pretties to see coming up! 

Someone tell me I'm not the only one with a house full of unfinished projects. I swear, there has to be a support group out there for this. One that comes with people willing to paint.

Cheers! 

Monday, May 13, 2013

Tile Eyes

Yup, that's a real medical term. Symptoms? Everything you look at looks like this


and this


and this

After 10 hours of tiling I wish we were further but I will give you a complete update when we are! Spoiler- it involves lasers and a lot of math.

How was your weekend? I got ceremoniously stomped upon by the dog for mother's day.
Cheers!

Tuesday, May 7, 2013

Welcome to my Life


The floor tile came yesterday but it was too hot to do anything but laze about. The Guinea Pig and I played on Pinterest and then planted some strawberries. It was a good afternoon. Today I'm off to go thrifting with my new IRL friend Megan from The Baroness. Wish us happy hunting! I'm looking for some dining room chairs...

Monday, May 6, 2013

Green Board

Is apparently blue! (it's the super mold resistant stuff you use for bathrooms in case you're not familiar with the term)


Or in other news- we finished drywalling! That is the sink wall.


Looking from the shower out.

Looking back in towards the shower.
And the toilet nook. Not exactly a huge bathroom but definitely an improvement on the original. In case you've forgotten


Yikes!

I had all sorts of plans to start tiling this weekend but installing the HardiBacker in the shower and pouring the shower pan took more time and effort than we thought (isn't that just the way things go?). But the floor tile comes today and I am ready to get this project done!

Cheers!

Wednesday, May 1, 2013

Smoothing Things Over

Our bathroom renovation is moving along at a decent pace. We are about ready to tile so I thought I'd share one step that was vital to successfully tiling the floor. Leveling.

You can see from this old picture of the downstairs bathroom that the flooring was a mess.


There was the old tile to be pulled up, newly exposed concrete (from moving that wall) and a post hole that was sticking out like a sore thumb. Obviously if I was planning on having a smooth floor something needed to happen. 

That is where floor leveler comes in. It is basically a really think liquid cement layer that you can pour on to a surface to smooth it out. It is self-leveling, which means it sinks in to low spots and makes everything nice and smooth. 

We used LevelQuik from the Home Depot. It was a pretty simple process. Daniel mixed it up in two batches. 


And then we poured it on to the floor. I started in the back corner and nudged things in to the places I knew needed to be filled.

It took one whole bag but now I have a nice clean smooth floor.

It dries just like concrete, so in about 12 hours we were done. Now everything is smooth and level and ready for our tiles.

I am so excited to get to tiling! They should arrive next week so hopefully our bathroom is only two weeks to completion! Now I just have to figure out paint colors...

Cheers!